Follow Our Blog

Our Awesome Followers

Powered by Blogger.
Showing posts with label How To. Show all posts

Friday, May 10, 2013

Shaping Your Brows


We’ve mentioned it before—eyebrows are very important to a woman’s overall look. Well groomed brows can totally transform a face. The problem is that there are so many ways that eyebrows can be done wrong—too thick, too thin, too short, uneven, etc.

Here are a few tips on how to achieve a good shape for your face:

  1. Use a pencil or other thin object to align the inner corner of your eye with the start of your eyebrow. Your brow shouldn’t extend past this line.
  2. The arch of your brow should match up with the outer part of your iris.
  3. The end of your brow should align with the natural upward curve of your bottom lash line.
Also make sure that you aren’t tweezing or waxing too much from the underside of the brow. Make it a point to leave your natural shape intact and get rid of hairs that are outside of your natural shape.

Some other tips: 
  • Don’t tweeze the top of your brows. There’s a misconception that eyebrow shape is attributed to the lower part of the brow, but the top provides a lot of shape too. Only get rid of obvious strays on the top.
  • If you aren’t sure how to shape your brows, visit a professional. There are plenty of places out there that offer eyebrow waxing or shaping. If you’re on a budget, you could ask for a consultation and revisit once or twice.
  • If your brows are too thin and you’re trying to grow them back, do some research and brow hair growth products. You could also invest in a good eyebrow pencil or powder to help fill in and keep you from continuing to over-tweeze or wax. 
How do you keep your brows looking great?


Wednesday, May 8, 2013

How To Soothe Irritated Ears


Ever since I was a baby, I’ve had my ears pierced. My first piercings were done before I could even talk. But, one of the problems I’ve encountered my whole life is sensitivity to certain types of metal. If I wear anything other than real gold, my ears become red, inflamed, itchy and irritated. So, what’s a girl to do? 

The easiest thing to do is buy earrings that don’t irritate your ears. But, if you aren’t able to do that there are a few other things you can do.

Do some tests. Experiment with various types of metals. Perhaps only one type of metal irritates your ears and others don’t. Then you know what to look for. One common irritant is nickel. If you can’t help but wear earrings containing an irritating metal (like I sometimes do), limit the amount of time you wear your earrings. Usually six to eight hours is my threshold.

Here’s one trick: before you put on your earrings, cover the post or loop in Vaseline. Vaseline provides a coating on the earring, moisturizes your skin and cuts down on the metal having such an intense effect on your ears. Though I haven’t tried it, I believe products like coconut oil or Neosporin would offer the same benefits.

If you’re already experiencing irritation, make sure you have take care of your ears. I usually clean my ear lobes with some rubbing alcohol or Bactine on a cotton ball. Then, just one of the products I mention to moisturize and heal the irritation. 

Do you have sensitivity to certain metals? How do you prevent or soothe irritation?


Monday, January 14, 2013

Fitness: HIIT Treadmill Workout


I tried this high intensity interval training (HIIT) workout on the treadmill last Friday and was sweating buckets when I was finished. It was so effective and since the speed, intervals and incline kept changing it kept my body guessing the entire workout. HIIT is the best way to get a high fat burning workout in that will really challenge your body in the least amount of time. 

Make sure you properly warm up and cool down to get the best results. Listen to your body -- if it doesn't feel right don't push yourself! Scale the speed or incline down a bit if you need to and work your way up.


What did you think of this workout? Do you have any other HIIT workouts you love?


Wednesday, January 9, 2013

How To Get the Perfect Pout


Not sure the best way to get a long-lasting look on your lips? Here’s how:

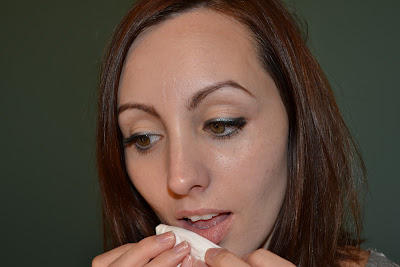
Start by putting on some lip balm at least five to 10 minutes before you plan to put on your lip liner, gloss and/or lipstick. I used a balm by Yes to Carrots.

Before you begin to put on your lip products, wipe off most of the lip balm. You want the balm to soften your lips, but not get in the way of your product sticking to your lips.

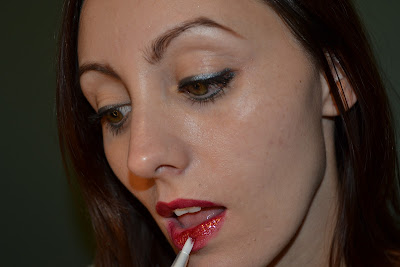
Start with lip liner to give your product something to stick to.

To line your lips, use short strokes to trace around the border of your lips. I usually start from the center and work outward.


When you’ve finished outlining the border of your lips, fill in your whole lip with the pencil.


Next, add your lipstick and/or lip gloss. Press your lips together as you go.


Use a cotton bud or bit of toilet paper to clean up any goofs.

All done!


For this look I used a Stila Lip Glaze, but you could always apply a lipstick then gloss over the top. If you apply a lipstick, try out this powder trick I posted about last year to help it last longer.

Enjoy your perfect pout!


Monday, January 7, 2013

How To Fill in Your Brows


If you’ve never filled in your brows, you might not realize what an impact it can have on your overall look. Whether you’ve chosen minimal makeup or are dolling up for a party, filling in your brows helps frame your face and makes your face look finished. 

One of my favorite ways to fill in my brows is with powder. The result is a really soft and natural looking finish. Here’s how to do it:

Start with an angled brush.

Run the brush through your powder and begin with the part of your brow closest to your nose. I usually select a color noticeably lighter than my natural brow color. Using a dark brown color, like the color of my brows, is way too intense on my face.

Brush the hairs upward until you have the inner portion of the eyebrow completely filled in. Use light, even strokes.

Turn the brush and begin coloring outward. Make sure to accentuate the arch of your brow.

If you feel like your brows need a little extra length, feel free to use the brush to extend the shape a bit.

Use a brow gel to hold everything in place. Brush all the hairs upward with the gel wand. Then, brush the hairs to the side. Continue shaping your brows with the gel wand until they are all in shape you desire.

All done! 

What are some of your favorite brow products? Share in the comments!


Thursday, January 3, 2013

How To: Pin Curls


Blame it on my new obsession with the show Mad Men (yes I know, I'm late to the party), but I’ve been crazy about doing my hair in curls and waves. If you don’t have a set of hot or Velcro rollers, don’t worry, because it’s really easy to get beautiful ‘60s curls with just a curling iron and some clips. Though it's not the traditional way of pin curling, this method will give you awesome retro hair!

Here’s what you need:
  • Mousse or root lifting spray
  • Curling iron
  • Clips or bobby pins
  • Hairspray
Here’s how to do it:

Before you dry your hair, massage in a mousse or root lifting spray and dry your hair either upside down or by lifting your hair with a paddle brush.

Create a deep side part in your hair and begin by sectioning off a part at the top of your head. If you want, you could backcomb each section to add even more volume to your hair.

Using a 1-inch curling iron, curl the first section of hair—be sure to hold for at least 20 – 30 seconds. Make sure to curl away from your face.


Once you’re done, softly release the curl and immediately roll it up and secure it to your head with a clip or bobby pin. Be very careful—your hair will be extremely hot.


Continue sectioning off, curling and pinning your hair until you’ve done your entire head. When you’ve finished curling and clipping, spray your entire head with hairspray.


Wait five to 10 minutes until all your hair has cooled. Then gently remove the clips from your hair, being sure not to pull or tug. When you remove the clips, you’ll wind up with something like this:


If you want to keep your hair full of curls, gently run your fingers through your hair and spray it with hairspray. Here’s how it looks:


If you want a more subdued look, softly run a paddle brush through your hair and mist it with hairspray. Here’s the final result:


This look is great to wear to work or for a fancy night out. Very glam! What’s your favorite retro hairstyle to wear?


Wednesday, December 12, 2012

The Right Way to Apply Undereye Concealer


If you suffer from dark circles under your eyes like I do, there are a few things you can try. You can drink a lot of water, elevate your head when you sleep, get more rest, eat healthier, put tea bags or a cold compress over your eyes or try to reduce stress. Just Google this topic and you’re sure to find dozens of natural remedies.

The list goes on. Sometimes though, dark undereye circles are a result of genetics or another condition. It might be something you just can’t control. If you’ve tried everything and you can’t get rid of the darkness under your eyes, it’s time to invest in a great concealer and learn the right way to apply it.

You’ll need a good creamy liquid concealer in a shade just lighter than your skin tone. After you’ve applied your foundation, start at the inner corner of your eye and draw a line straight down with your concealer stopping at the bottom of your nose. From the bottom of the line you just drew, extend the line out toward the outer corner of your eye. Connect the two lines you drew to form a triangle, then fill in the triangle with concealer. You should have something that looks like this:


Yes, it looks ridiculous, but you’ll thank me when you’re done! The reason for drawing on a triangle is to make sure your concealer and foundation blend together. Most women don’t usually use a foundation and concealer that match exactly and the dark circles under your eyes make the skin appear a different color than the rest of your face. You want to make sure that you’re blending all your makeup together so your face is one color!

From here, you have a couple of options to blend out the concealer. My favorite way is using a damp makeup wedge. Wet the sponge, squeeze out the water and gently bounce it off your skin to smooth in the concealer. Gently blend the edges down and out and up toward your eye. Once you’re finished, use a fluffy brush to apply powder to set everything. Make sure you don’t apply the powder using strokes or a buffing motion; just press the powder on top so you don’t move any of the concealer.

Got any tips for covering up dark circles? Share in the comments!


Tuesday, December 11, 2012

Health: How to Battle Stress


{via}

I had a very stressful day both personally and professionally yesterday and it got me thinking about ways I manage my stress and other ways I could handle it better. I thought this would be a great reminder to me and give all of our readers out there who deal with stress some tips. 


1. Take a deep breath and do some stretching. Fellow yogis out there -- a few sun salutations go a long way. For all of you who do not speak yoga I'll give you a shorter version -- close your eyes, take a few deep breaths, lift your arms above your head and reach for the sky. Try to clear your mind and not think about what is stressing you out. Do a few neck rolls to the right and now to the left and slowly open your eyes. Feel better? Sometimes just taking a mini mental break gets me back on track.

2. If it's going to take more than a little breathing exercises, try sneaking in a 30-60 minute workout. I know, sometimes when you're stressed the last thing you want to do is workout. But trust me on this, once you get out some of that nervous energy you'll feel a million times better. I find that working up a little sweat makes whatever I was stressed out about seem much easier to tackle and I have a better handle on my problem. 

3. Find your favorite song or playlist and crank it! If you're at the office invest in some good headphones so you can blast your uplifting tunes. If you're alone, singing out loud on the top of your lungs does wonders. You wouldn't believe how much better I feel once I belt out some tunes. 

4. Remember to eat and eat well. One of my major downfalls of being stressed is I lose my appetite and don't feel like eating. When I do force myself to eat it usually comes in the form of calorie ridden comfort foods. Not good for my energy levels or waste line. Not eating for long periods of time not only kills my metabolism but it also drains all of my energy to deal with whatever is stressing me out. I schedule meals for myself and plan ahead to make sure they are nutrient-dense foods. I feel so much better when I take care of my body. 

5. Vent to a friend or family member (preferably not a coworker if it's a work related issue). Sometimes I feel SO much better if I can just talk to someone about what I'm going through. They may not be able to offer any advice, but you'd be surprise how much stress and pressure you can release by just letting it out. This helps prevent any major meltdowns from built up stress and anxiety. 

6. Dance! I know, sounds like a lame idea but honestly sometimes just being silly and dancing really helps me get out of my bad mood. It really helps me forget what was stressing me out and life doesn't seem so bad when you're carefree and having fun. Try it -- it works wonders.

7. Take a bubble bath. Pour yourself a hot bath, add some bath salts, bubbles, oils or whatever else will put you in a relaxed mood. I LOVE the Bath & Body Works aromatherapy eucalyptus spearmint relaxing nourishing body lotion after a long bath or shower. The scent instantly relaxes me and puts me in a calm mood. 

8. Get a massage. Nothing beats a professional massage when you're stressed out. On a budget? Have a friend or family member rub your tense shoulders and neck. It makes a world of difference to get those toxins out of your body and all the kinks worked out. 

9. Do something else on your to-do list to distract you. Sometimes after a stressful day at the office it  feels so good to clean the house (crazy I know), cook a good meal, write a blog post ;), do the laundry or something else on my to-do list that I know I can tackle. Sometimes my stress comes from things outside of my control so doing something routine helps me get out of my stressed out phase. I know it sounds odd but it really works! 

10. Read a good book. I can lose myself in a good book and I forget what is going on around me. Don't like to read? Pick up your favorite magazine or watch a TV show or movie you've been wanting to see. Escaping into another reality for a bit really helps.

If all of the above don't seem to do the trick have a glass of red wine. It always helps calm me down and relax me. Don't overdo it though, feeling hungover and dehydrated the next day never helps. After one glass my problems seem a little less intense. 


Do you do any of the things we listed above to de-sress? Are there any other tips you have for battling stress? 


Wednesday, November 14, 2012

How To Get Big Hair


Big ~ SEXY ~ Hair!

If you’ve got fine or thin hair and struggle with getting volume in your hair, don’t worry because it’s really easy! All you need are a few tools and products that you probably already own, some time and the right technique.

What you need:

  • Mousse
  • Blow dryer
  • Curling iron, 1 inch
  • Set of Velcro rollers, 1 or 1 ½ inch
  • Heat protectant
  • Hair spray 

How to do it:


1. Towel dry your hair. Make sure to squeeze the water out and not rub your hair or scalp. Apply a small amount of mousse.
2. Flip your head over and dry your hair completely. Spray your hair with heat protectant and finger comb your hair.
3. Section your hair into three portions—one on either side of your head and one section on the top of your head. Clip off the side sections for now.
4. Take a 1-inch section of hair from the top of your head and curl it backward. Hold for 30 seconds. Immediately after you release the curl, grab a Velcro roller and place it in your hair in the same manner you curled your hair. Secure with a bobby pin at the base of the roller. The key to this step is to get the roller in your hair while it’s still hot from the curling iron.
5. Continue this way until you’ve done the middle section of your hair. Once you’ve finished the middle section, repeat this process until you’ve done each side of your head.

Hair rollers come in all shapes and sizes . . . Hot rollers, velcro rollers and hotsticks. Although these all fall into a "hair roller" category, each will create a uniquely different result. Learn more about them today!

When you’re finished curling and placing rollers in your hair, mist all of your hair with hairspray.
6. Leave the rollers in your hair until they completely cool. I usually have to do my makeup, watch tv or do some housework to keep myself occupied long enough that I don’t touch the rollers until they’re ready to come out!
7. Once the rollers have cooled, gently remove each one without pulling on the curl.
8. After you’ve removed the rollers, spray again with hairspray and mess your hair with your fingers. (You could also gently tease the roots of your hair before this step for some extra staying power.)


Be patient with this method. It takes times, but it’s totally worth it. Make sure to curl each section of your hair for AT LEAST 30 seconds and to let the Velcro rollers cool completely.

What are your favorite methods for volumizing your hair? 


Wednesday, October 3, 2012

How To Remove Self-Tanner


Fall is officially here. You’re most likely changing up your wardrobe, skincare routine, makeup, footwear and all those other fun things one must do to adjust to the cooler temperatures. 

Since summer is gone, it’s also time to get rid of the faux tan. 


Though some people like to keep their bottle of self-tanner handy during fall and winter, I think an all-over tan just looks too unnatural. I prefer to just subtly use some bronzer on my face at this time of the year. The problem with letting your fake tan fade is the unevenness that can occur. If you’d like to get rid of your fake tan a little faster, check out these tips:

Exfoliate: Okay, so this does not mean scrub until you’ve removed several layers of skin. Exfoliate gently using a loofah, sugar scrub or washcloth every day and this will help speed the process of lightening the tanner. 

Use lemon: If you’ve only got a few tanner streaks, apply lemon juice. It acts as a natural exfoliator and the acidic properties help lighten tanner quickly.

Use rubbing alcohol: Soak a cotton ball in rubbing alcohol and run it over any areas you want to lighten. Be careful with this method. Rubbing alcohol is very drying, so once you’ve finished you’ll want to wash your skin with soap and water and then moisturize.

Soak in the tub: If you’re an avid self-tanner, you’ve most likely noticed that your hands always fade first and fade fast and it’s because people wash their hands throughout the day. When you decide you want to get rid of your tan, try soaking in the tub for a while. Exposing your skin to soapy water can help begin the process of lifting the tanning product. 

Use baking soda: Apply some baking soda to a wet washcloth and gently rub it over your skin. This method won’t work extremely quick, but you’ll notice your self-tanner fading after a few tries. One of the good things about using baking soda is that it won’t be harsh or drying on your skin.

Buy a formulated remover: There actually are products on the market designed to help get rid of faux tans. One to check out: St. Tropez Tan Remover, $18

Tan Remover
Do you have any secrets to speeding up the process of removing self-tanner?


Tuesday, September 4, 2012

Health & Fitness: Circuit Workout to Make you Sweat


Time is one main issue I have with working out. There is never enough time in the day to get everything we need to done. An easy thing to skip? Your workout. Guess again. With this short circuit workout all you’ll need is about 25 minutes. That’s right – no gym equipment necessary.
Do each following moves for a minute with 30 seconds break in-between. If you are not familiar with any of these exercises please Google Image or look on YouTube for some proper demonstration.
Jumping jacks
Squat Jumps
Pushups (straight-legged or knees bent)
Frog crunches
Jump rope
Plié squats
Tricep dips
Bicycle crunches
Ski jumps
Front lunges
Side planks
Ab twists
Burpees
Side lunges with leg raise
Triangle pushups
Planks with knee twists

Afterwards be prepared to be a sweaty mess! Be sure to check with a doctor before changing your fitness routine. Listen to your body – if it doesn’t feel right, DON’T DO IT!

What did you think of this 25 minute circuit workout? Are there other quick workouts you enjoy?