Follow Our Blog

Our Awesome Followers

Powered by Blogger.
Showing posts with label DIY. Show all posts

Monday, June 10, 2013

Wedding DIY: Vintage Escort Cards


Right now I'm relaxing on a beach somewhere in Maui! Jay and I just got married last Saturday and I scheduled some wedding related posts for you this week in honor of our special day :) I hope you enjoy! 

We wanted to do something a little different for our escort cards at the wedding. We got married on an organic farm and we we're really playing up the vintage vibe. The farm also has honey bees (on another property nearby) and they jar and sell their honey. We bought a bunch of jars in four flavors (raw, cocoa, mint and cinnamon) and I wanted to incorporate the escort cards to tie it all together. 


I used some thick brown card stock, a large tag punch, mint bakers twine and the honey jars to create the final look. I used Adobe PhotoShop to create the tags using two different fonts. I made the last names larger so that our guests could easily find their jar.  After I was happy with the font and size, I printed them on the card stock in a darker brown ink color. I then cut the card stock in to smaller pieces so I could use the punch to get the exact shape I wanted. After they were punched out I measured some bakers twine and tied it around the jars. So simple! It didn't take long at all. 


After they were all put together I put the jars in vintage cocoa-cola crates that I found at an antique shop. I think these look great with our vintage theme and I am really happy how they came together! 


Future brides: will you do something unique for your escort cards? What other DIY ideas do you have?


Thursday, April 18, 2013

Spring Cleaning Tips


I am someone who absolutely can’t stand clutter and messes. But even with how cautious I am about how much stuff I bring into my home, it always turns out that once or twice a year I find things that I want to get rid of. This past weekend I did just that—took a few hours to do some spring cleaning. Not only did I collect things to get rid of, I did some deep cleaning to areas of my home that I don’t get to weekly.  


Here’s a quick guide to things to consider cleaning, tossing or donating:

Kitchen
  • Throw out expired cleaning products.
  • Clean your dishwasher. I recently discovered Finish dishwasher cleaner. Open it up, stick it in your dishwasher and run a cycle. You’d be surprised how much gunk builds up and how will this little package can help eliminate it. 
Bathrooms
  • Throw out expired hair products, sunscreen, lotions, etc. 
  • Go through your makeup collection and get rid of expired items or those you never use.
  • Deep clean tiles and grout.
Laundry 
  • Take a few minutes to wipe down your washer and dryer, including crevices.
  • Use a vacuum attachment to vacuum around your washer and dryer and in between. You’d be surprised how much dust accumulates.  
  • I have a bunch of linens that I don’t use. This includes placemats, cloth napkins and pillowcases. If possible, I plan to donate them. If not, I might try to find a way to repurpose these items or give them to someone I know before just tossing.
Living room
  • Remove couch cushions and vacuum/clean inside the couch.
  • Clean blinds or window treatments. 
Bedroom
  • Find clothes, purses and shoes to donate—if you haven’t worn or used it in over a year you probably won’t again. It’s incredibly hard to part with these items, but it’s all in the name of de-cluttering!
Garage
  • Unfortunately, my garage is being used to house a bunch of my dad’s items. Otherwise I’d make it a point to sweep out the garage and wash the floor. 
Miscellaneous
  • Dust areas of your house that you may not regularly get to (e.g., tops of pictures or wall hangings, door frames or top of cabinets).
  • Take time to organize your junk drawer. Everyone has one—just organize it. My junk drawer is located in my kitchen and it’s been home to an array of tools, papers, keys, knick-knacks, Tylenol, etc. It now only contains a few tools that will help me around the house.
  • Vacuum places you don’t regularly get to—under couches, beds and furniture. You can even use an attachment to clean walls, ceilings and corners. 
  • I collected a bunch of books I have laying around the house and plan to donate them. If a book has special meaning to you or is something you reference often, don’t get rid of it. I’m planning to keep books I used for grad school or ones that I received as gifts. Everything else can go.
  • I had a bunch of board games in the closet in my guest bedroom. Why? I never play them. I went through to make sure all the pieces were intact and I plan to donate the games.
This list is by no means complete—it’s just a list of things I did last weekend or things I plan to do very soon. What are your spring cleaning rituals?  


Monday, March 25, 2013

Seven Pieces: Lots of Possibilities


I recently went shopping and picked up some clothes from Old Navy and Target. I’ll be traveling to Florida next month and I wanted some new spring/summer items for my wardrobe. Here’s what I got:


From Target:
  • Chartreuse Pencil Skirt, $22.99
  • Cobalt Blue Hi Low Foldover Maxi Skirt, $17.99 (got for $15.99)
  • Mossimo White Denim Jacket, $29.99
  • Coral Eyelet ¾ Sleeve Shirt, $13 (clearance)

From Old Navy:
  • Green Eyelet Tube Dress, $34.94 (got for 30% off)
  • White Cropped Rib-Knit Cardi, $15 (got for $10)
  • Rockstar Zip-Pocket Skinny Pants, $34.94

(There were a few other things I got, like a t-shirt, socks and nylons, but I’ll leave those out for the purpose of this post!)

One thing I am guilty of, as I’m sure we all are, is getting bored with the clothes I have. I’ll fall in love with a piece, buy it, then a few months later feel like I’ve got nothing to wear. So, with the new things I bought I challenged myself to combine everything in creative ways to see how many outfits I could come up with. See below for the results. The ONLY thing I added is a black tank top that I already own. 


As you can see, there are TONS of combinations. And think of how many more combinations I could come up with just by using the other things already in my closet. I could multiply the possibilities just by adding things that everyone owns, like jeans or a white tank top. I didn’t even add shoes or accessories! Each of these looks can be dressed up or down by wearing flats or heels or dressy or casual jewelry. This little exercise has really inspired me to be more creative with my wardrobe and try to use the pieces I already have in new and fun ways.

How do you stretch your wardrobe?


Friday, December 14, 2012

The Perfect DIY Co-worker Gift


Each year around this time, my workplace gears up for the holidays. There’s a company holiday party, department parties and co-worker gift exchanging. Typically within my department, each person gives something to everyone. Since it gets pricey to buy gifts for everyone, this year I’ve decided to go the DIY route.

This year my co-workers are getting chocolate cupcakes with peppermint frosting! And of course, I had to add some holiday decorations. I purchased the supplies, including sprinkles, decorations, liners and cupcake boxes (each holds four cupcakes) at Michael’s. I also attached a hand written note to each box. For under $20, I am able to give homemade treats to 11 of my co-workers! 

Here are some pictures from my fun night of baking:


Got any great DIY gift ideas? Share in the comments!


Wednesday, October 31, 2012

Zombify Yourself for Halloween!


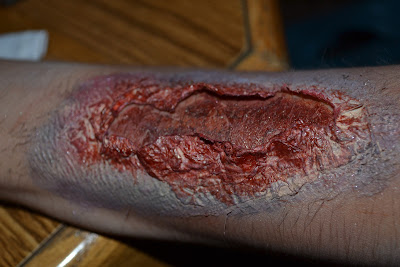
Happy Halloween! This is such a fun holiday. Because I love makeup, it’s the time of year when I can take things to the extreme. If you love playing around with makeup and need a last minute costume idea, let me show you how I turned myself into a zombie last Halloween.

In terms of clothes, the options are really limitless. You could find something at a thrift store—you could dirty up the items or cut holes in them. I went for a flannel dress with some ripped up black leggings. 

Warning: You might scare small children. I again apologize to Amanda's niece!

Now, onto the makeup…

All you’ll need is some cream makeup in various colors (white, gray, black, red, green, purple), regular liquid foundation, makeup sponges, makeup brushes, tweezers, toilet paper (yep!), fake blood, liquid latex and a hair dryer. The cream makeup and liquid latex could be found at any Halloween superstore, like Party City. Just a warning—when you buy supplies at a Halloween store they are most likely going to be of low quality. They will still work, but the cream makeup will be a little difficult to work with and the liquid latex may be too thin. The fake blood from superstores is usually way too thin and doesn’t stay put. If you want to do the zombie look right, try buying your supplies in advance from a good special effects store online like bennyemakeup.com or graftobian.com.

As you can see, I used some lower quality products and they dried out!

Here’s how to achieve some really cool zombie gashes and wounds:
  1. Plan out where you want your wounds and how large you want them to be. 
  2. Tear a few pieces of toilet from the roll and pull them apart so they are only one-ply. Set them aside. 
  3. Start by applying a thin layer of liquid latex with a makeup sponge (DO NOT use your makeup brushes) where you want your wound. Before it dries, take a one-ply piece of toilet paper and press it on the latex. If this doesn’t cover the entire surface of the latex, grab another piece and cover the rest. Tear off the excess around the edges and discard them. Use your hair dryer for a few seconds to dry out the area a bit.
  4. Add another layer of latex on top of where you just applied the first piece of toilet paper. Immediately take another piece of toilet paper, press it on top and tear off the excess. This time when you apply, don’t apply it perfectly, try to wrinkle it up a bit so it doesn’t lay perfectly flat against your skin. You’re going for open wounds here—you don’t want it to look nice and smooth. Use your hair dryer again to dry it out.
  5. Add a third layer (I’d recommend a fourth layer if you have the time). Again use your hair dryer to dry the area.
  6. Repeat this same process everywhere that you want a wound to appear. Just a warning—if you place a wound somewhere on your body that has hair (like your arm), it WILL hurt when you remove everything at the end of the night. I learned this the hard way. 
  7. Once you are finished placing all your fake wounds, it’s time for makeup. The first thing you'll want to do is darken up your eyelids and area around your eyes. You can use some regular black, dark purple and dark brown eyeshadows for this.
  8. Then mix your regular liquid foundation with some white cream makeup. The goal is to pale out your skin to give yourself a gaunt look. Make sure to apply this on your neck, chest and arms if they are exposed. It’s important to cover anywhere you placed your fake wounds.
  9. Next, mix some gray and green cream makeup. Use a sponge to blend a bit into your skin. This will help make you look sickly. Make sure to cover your fake wounds. Do the same with a blend of purple and gray cream makeup, but this time only add a little to your fake wounds. This will help create a bruised effect only in those areas.
  10. Now it’s time for the fun part. Use a pair of tweezers to gently start picking at the center of the layers of toilet paper and latex. You want to create a small hole. Once you’ve done that, make the hole bigger with your fingers and tear off a bit from the center so that the edges are jutting forward. Do this for all fake wounds.
  11. Now it’s time to bring those wounds to life. Using a small makeup brush (eyeshadow brushes are ideal), take some red cream makeup and color your skin inside the fake wounds. Using a separate brush, take a little black cream makeup and color on top of the red cream makeup you just applied. You want it to look very dark red.
  12. Add some fake blood around the edges of all the wounds and at the edges of your mouth.

And you’re done!

A few more fun tricks: 
  • Apply several layers of liquid latex to your skin (making sure to let each layer dry first). Pick little holes in the latex with a pair of tweezers to create an effect like the skin is decaying and tiny pieces are falling off. And of course, use makeup to color the area. This effect could also be used to make the skin look like it has been severely burned.
  • If you do very thin lines of liquid latex on your skin and build them up to be nice and thick, you will achieve the look of raised scars, which can also look very cool for your zombie costume.
  • Don’t want to go through all the trouble of creating your own zombie wounds? Just buy some pre-made gashes at your local Halloween superstore, secure them to your body with liquid latex and add some fake blood. All done! This method is a lot quicker, but I think the DIY method looks more authentic.

Did you go for a zombie look this Halloween? Share in the comments!


Thursday, October 11, 2012

DIY: Hair Clarifying Treatments


Not only was I cursed with stick-straight limp hair, it tends to get oily pretty quickly and weighed down if I use any mousse or hairspray. In addition, whenever I use styling products they tend to build up in my hair and over time cause my hair to look like it has even less volume. If this sounds anything like your hair, you might want to consider trying a clarifying treatment. 

There are some shampoos on the market specifically formulated with the intention to remove any kind of build-up, dirt or oil from the hair. You can get them at drug stores or specialty retailers, like Ulta or Sephora.

If you’d rather try some at-home remedies instead of spending the money on a shampoo, check out the following DIY options:

One of the simplest ways to get rid of hair build-up is to add baking soda to your regular shampoo. Next time you wash your hair, combine two parts shampoo to one part baking soda. Try to use at least one tablespoon of baking soda—you really want the baking soda to cover your entire scalp and really get to work removing dirt. Shampoo your hair and let everything sit for about one minute, then rinse with lukewarm or cool water. Once you’ve washed your hair, you can condition as you normally would. 


Another easy way to remove build-up is with lemon juice. Combine about ½ cup of fresh lemon juice with a few cups of warm water. Pour the mixture on your scalp, massage it and let everything sit for five to 10 minutes. Rinse your hair with lukewarm or cool water, then shampoo and condition.


Get some apple cider vinegar from your local grocery store. Wet your hair and massage one or two tablespoons into your scalp. Let it sit for about five minutes and rinse with lukewarm or cool water. Shampoo and condition your hair.


Tips and suggestions:
  1. With any of these DIY home treatments, I would recommend clarifying your hair once per month. Using baking soda, lemon juice or apple cider vinegar on your hair too often could promote color fading if you dye your hair. If you use a lot of hair styling products, you might want to clarify more often to make sure you’re getting rid of all the build-up.
  2. To make things easier with the lemon juice or apple cider methods, you could combine the ingredients for each into a large spray or squirt bottle. This will make it much easier to apply directly to your scalp.
  3. If you feel like these at-home remedies aren’t effectively getting rid of the build-up in your hair, you might want to talk to your stylist to see if she/he can recommend a specific clarifying shampoo or method. Or, your stylist might be able to recommend some new styling products that won’t cause as much build-up.
Do you have any DIY methods to get rid of hair build-up? Share in the comments!


Wednesday, October 3, 2012

How To Remove Self-Tanner


Fall is officially here. You’re most likely changing up your wardrobe, skincare routine, makeup, footwear and all those other fun things one must do to adjust to the cooler temperatures. 

Since summer is gone, it’s also time to get rid of the faux tan. 


Though some people like to keep their bottle of self-tanner handy during fall and winter, I think an all-over tan just looks too unnatural. I prefer to just subtly use some bronzer on my face at this time of the year. The problem with letting your fake tan fade is the unevenness that can occur. If you’d like to get rid of your fake tan a little faster, check out these tips:

Exfoliate: Okay, so this does not mean scrub until you’ve removed several layers of skin. Exfoliate gently using a loofah, sugar scrub or washcloth every day and this will help speed the process of lightening the tanner. 

Use lemon: If you’ve only got a few tanner streaks, apply lemon juice. It acts as a natural exfoliator and the acidic properties help lighten tanner quickly.

Use rubbing alcohol: Soak a cotton ball in rubbing alcohol and run it over any areas you want to lighten. Be careful with this method. Rubbing alcohol is very drying, so once you’ve finished you’ll want to wash your skin with soap and water and then moisturize.

Soak in the tub: If you’re an avid self-tanner, you’ve most likely noticed that your hands always fade first and fade fast and it’s because people wash their hands throughout the day. When you decide you want to get rid of your tan, try soaking in the tub for a while. Exposing your skin to soapy water can help begin the process of lifting the tanning product. 

Use baking soda: Apply some baking soda to a wet washcloth and gently rub it over your skin. This method won’t work extremely quick, but you’ll notice your self-tanner fading after a few tries. One of the good things about using baking soda is that it won’t be harsh or drying on your skin.

Buy a formulated remover: There actually are products on the market designed to help get rid of faux tans. One to check out: St. Tropez Tan Remover, $18

Tan Remover
Do you have any secrets to speeding up the process of removing self-tanner?


Thursday, August 23, 2012

Wedding Makeup Looks

 
I've been going back and forth lately on if I should have my makeup professionally done for my wedding or if I should just do it myself. The thought of me doing my own makeup for such an important day where all eyes are on me … terrifies me. It’s a lot of pressure and I’m not sure if I will want to worry about that with so much other stuff going on. I know that I could most likely pull off what I’m going for, but the less stress I put myself about the wedding (especially the day of) the better. I still have some time to decide if I want to attempt to do it myself.
 
In the meantime I’ve pulled some natural looks for what I’m going for. I want to look like myself, just slightly enhanced. I know I’m going to have the “wedding day glow” that all brides have the day of their wedding, so why would I want to cover all of that happiness and love up?
{via}
{via}
{via}
{via}
 
I am going to play around with some of these different looks (with Adrianne’s help of course) to see if I can master these or if I should leave it up to the pros to make me look my best.
 
What do you think of these natural looks? Brides out there – did you do your own makeup or have someone do it for you?


Friday, August 17, 2012

Wedding DIY Craft Ideas


It's no secret that I love crafting. Adrianne and I even have designated crafting dates every so often to try out new ideas we have or projects we've admired on Pinterest. I'm planning on doing all of the crafting decore for my wedding myself (yikes - that's why I'm starting now!!) and you better believe I'll be stealing Adrianne to help me.

Some craft ideas that I can't wait to do for the the wedding:


{via}
{via}
{via}
{via}
{via}
{via}
1. DIY floral headband for our adorable niece Addie who is also our flower girl.

2. Heart garland for decoration around the tent and barn - swoon.

3. Burlap flag bunting (I plan on doing a lot of this) for the sweets table, gift table and general decoration/

4. Tissue and fabric pom poms.

5. Wooden signs for directions.

6. Chalkboard table numbers.

I already spent a ton of time in Hobby Lobby the other day dreaming up things I can do. I need to make sure I don't take on too much and only do projects I really love. I'll be sharing all of my progress on the blog so be sure to check back!

So what do you think? Have you seen other DIY wedding crafts that I should consider trying?