Follow Our Blog

Our Awesome Followers

Powered by Blogger.
Showing posts with label Dessert. Show all posts

Friday, February 15, 2013

The Best Yellow Cake Cupcakes with Chocolate Buttercream Frosting Recipe


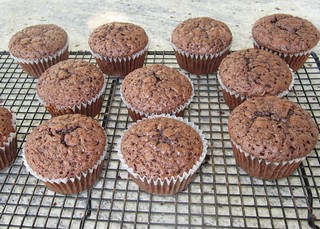
Can you believe it? Valentine's Day is officially over already! I hope you all had a great day that was filled with tons of love -- no matter what you ended up doing. I'm going to share the BEST yellow cake cupcakes with chocolate buttercream frosting recipe with you today. I know it's a day late if you were looking for something sweet to bake for the holiday, but these are great ANY day of the year. Warning: cleanup can be tricky since you're going to the extra mile and not using a boxed cake mix or jar of frosting but the extra effort is definitely worth it. You can see from the photos that I need to work on my frosting skills, but as long as they taste delicious I think we can let that slide ;)

What you need for the chocolate buttercream frosting:
1 cup unsalted butter (2 sticks or 1/2 pound), softened
3 1/2 cups confectioners (powdered) sugar
1/2 cup cocoa powder
1/2 teaspoon table salt
2 teaspoons vanilla extract
4 tablespoons heavy cream

What to do:
1. Cream butter for a few minutes with a hand mixer.
2. Stir 3 cups powdered sugar and cocoa mixture into the mixing bowl.
3. Turn mixer onto the lowest speed until the sugar and cocoa are mixed with the butter.
4. Increase mixer speed to medium and add vanilla, salt and cream and beat for 3 minutes.
5. If frosting is a little runny, add a little more sugar and mix again/If your frosting is a little too thick, add additional cream 1 tablespoon at a time. (I had to add two additional tablespoons of cream before my mixture was perfect)


What you need for the yellow cupcakes:
2 cups all-purpose flour
1 + 1/4 cup sugar
1 tablespoon baking powder
1 teaspoon salt
1/2 cup butter (1 stick), softened
1 cup milk (I used skim)
1 teaspoon vanilla extract
2 eggs
24 cupcake liners

What to do:
1. Preheat oven to 350 degrees. Place your cupcake liners in your cupcake baking pans.
2. In a large mixing bowl stir together flour, sugar, baking powder and salt.
3. Add butter, milk and vanilla. Beat with a hand mixer on medium speed for 3-4 minutes, occasionally scraping sides of bowl. Add eggs, beat for 3 more minutes.
4. Pour batter into cupcake liners, filling each 3/4 of the way full. Bake approximately 25 minutes or until knife comes out clean.
5. Let completely cool before icing -- VERY IMPORTANT unless you want runny butter cream :)

 
Let us know if you make these cupcakes! Any other sweet treat recipes you'd like to share?


Friday, December 14, 2012

The Perfect DIY Co-worker Gift


Each year around this time, my workplace gears up for the holidays. There’s a company holiday party, department parties and co-worker gift exchanging. Typically within my department, each person gives something to everyone. Since it gets pricey to buy gifts for everyone, this year I’ve decided to go the DIY route.

This year my co-workers are getting chocolate cupcakes with peppermint frosting! And of course, I had to add some holiday decorations. I purchased the supplies, including sprinkles, decorations, liners and cupcake boxes (each holds four cupcakes) at Michael’s. I also attached a hand written note to each box. For under $20, I am able to give homemade treats to 11 of my co-workers! 

Here are some pictures from my fun night of baking:


Got any great DIY gift ideas? Share in the comments!


Thursday, November 22, 2012

Cherry Pie Recipe


Looking for a dessert to bring to a holiday party? This cherry pie recipe takes a while to prep and cool, but it’s really easy to make and tastes great. Here’s how to make it:

What you need:
  • 2 pounds of cherries; pitted and halved (get fresh cherries – it makes the pie so much better!)
  • ½ cup of sugar
  • 2 tablespoons of cornstarch
  • 2 tablespoons of lemon juice
  • All-purpose flour for rolling 
  • 1 large egg yolk
  • 1 tablespoon of water
  • 1 tablespoon of turbinado or sugar
  • Pie dough
  • Aluminum foil
  • Parchment paper
  • Pizza roller
  • Kitchen shears
  • Pastry brush
  • Pie dish

How to make it:
  1. If you listened to my advice and got fresh cherries, the first thing you need to do is pit and halve them. This takes a while, but trust me, it will be worth it. Set the cherries aside in a bowl.
  2. Preheat your oven to 400 degrees and put the rack in the lowest position.
  3. I typically buy pre-made pie crust. If you make it from scratch, do that after you pie and halve your cherries. Lay parchment paper on your counter and sprinkle flour over it. Roll a 14-inch round of dough. Gently lay the dough onto your pie dish and press onto the bottom and sides. Make sure not to stretch the dough at all. If the dough overhangs the pie dish, that’s okay for now.
  4. In a large bowl, combine the cherries, cornstarch, lemon juice and sugar. Toss the mixture until all the cherries are coated. Pour the mixture into the pie crust.
  5. Roll another 14-inch round of pie dough on floured parchment paper. Using a pizza cutter, cut the rolled pie dough into 8 half-inch wide strips. Discard the shortest two. Weave the strips on top of the pie to form a lattice. Not sure how to do this? Click here. 
  6. Once you’ve finished your lattice pattern, use kitchen shears to trim all the overhanging dough so that only 1 inch is left hanging over the sides. Tuck the lattice strips under the rim of the bottom crust and press to seal it together. Use a fork and gently press the edge all the way around to make a crimped effect.
  7. In a small bowl, mix an egg yolk and 1 tablespoon of water. Using a pastry brush, brush the mixture onto the top of the pie crust. Use 1 tablespoon of sugar to sprinkle all over the top of the pie.
  8. Bake the pie for about 60 to 70 minutes, or until you can see the cherry filling bubbling all over. Tent with foil when the crust starts to brown, at about the 40 minute mark. Not sure how to do this? Click here. 
  9. When the pie is finished baking, remove it from the oven and let it cool until it is room temperature, or for about 3 hours.

Enjoy! 

Monday, November 19, 2012

Cheesecake Recipe for the Holidays


I know we like to share healthy recipes on this blog but in the spirit on the holidays I couldn't resist sharing my all time favorite cheesecake recipe. Beware: this is not healthy at all but it's seriously delicious.


The Best Cheesecake You'll Ever Taste Recipe

You'll need:
2 cups graham cracker crumbs
1 cup plus 1 tablespoon sugar
1 stick butter
3 (8-ounce) packages cream cheese, softened
3 eggs
1 teaspoon vanilla extract
1 tablespoon lemon juice
1 cup heavy cream
 
What to do:
1. Preheat the oven to 350 degrees.
2. If you can't find graham crackers already in crumb form (like me) you'll need to crush those bad boys up. I used a package and a 1/4 of graham crackers to get 2 cups of the crumbs. I put the graham crackers in a ziplock bag and sealed it (this is very important unless you want crumbs all over your kitchen) and I used a rolling pin to create small crumbs. This takes a lot of elbow grease so be prepared for a workout while doing this.
3. Mix the crumbs and 3 tablespoons of sugar together and melt the butter and stir into the crumb mixture. Press the mixture into the bottom of a greased (I used more butter) 9-inch round, springform cake pan. Set aside.
4. Using an electric beater, blend the cream cheese and the remaining sugar together until creamy, wiping down the sides of the bowl and the beaters with a spatula to incorporate all of the cheese.
5. Add the eggs one at a time, beating after each addition.
6. Add the vanilla and lemon juice to the cream, then slowly stir into the cheese mixture.
7. Put the prepared round cake pan into a slightly larger rectangular pan.
8. Pour the cheese mixture into the round cake pan.
9. Set both pans in the oven and fill the rectangular pan with water, half way up the sides of the round pan. It's important not to put any water into the rectangular pan until it's in the oven. I didn't do that the first time and water went everywhere. Lesson learned.
10. Bake until firm and golden brown, approximately 55 to 60 minutes. I'm not sure if it's my oven but I had to leave it in for 10-15 minutes extra to get the top of the cheesecake to be golden brown. Make sure to check on it every 5 minutes or so.
11. Cool completely before removing from the pan.
12. Enjoy. It may not be healthy but it sure is delicious. 

Thursday, November 8, 2012

Chocolate Brownie Cupcake Recipe


Brownies + cupcakes – two things I love. I do try to eat healthy, but sometimes I just can’t resist baking a delicious treat. 

These chocolate brownie cupcakes are quick and not difficult to make. In fact, I bet you have a lot of the ingredients already in your home!


What you’ll need:
  • 3 ½ ounces of milk chocolate
  • 1 cup of pecans or walnuts (your choice, thought I like walnuts better with this recipe!)
  • 7 ounces of chopped bittersweet chocolate
  • 10 tablespoons of lightly salted butter
  • 3 eggs
  • 1 cup of packed light brown sugar
  • 1 ¼ cups of self-rising flour
  • ½ teaspoon of baking powder
  • Cupcake liners

Extras:
  • Cocoa powder for dusting, if desired
  • Ice cream for serving, if desired

How to do it:
  1. Pre-heat your oven to 375 degrees.
  2. If you don’t have pre-chopped milk chocolate and nuts, chop them before you begin.
  3. Line your cupcake tin with liners.
  4. Melt the bittersweet chocolate with the butter in a double boiler. Stir frequently until it’s smooth, then remove from heat. Not sure how to do this? Click here for a good tutorial.
  5. In a separate bowl, beat the eggs and sugar together. Add this mixture to the bittersweet chocolate and nuts. Sift the flour and baking powder, then add it to the bowl and stir.
  6. Stir in the milk chocolate and nuts, then place some of the batter into each cupcake liner.
  7. Bake for about 12 minutes, checking frequently. You want the tops of the cupcake to form a light crust, but for the rest of the brownie cupcake to be soft. Once you remove the cupcakes from the oven, let them rest and cool for about 10 minutes.
  8. To serve, place a mini scoop of ice cream on top of each cupcake. Dust the top with cocoa powder.

Enjoy!


Monday, October 15, 2012

Simple Apple Cobbler Recipe


I picked up this bag of apples at Trader Joe’s since they looked so lovely and were super cheap. 


The problem is that I can’t possibly eat that entire bag, so I decided I needed to make a dessert to help me run through the supply. I decided on apple cobbler because it’s really easy to make, it’s delicious and it couldn’t be more perfect for fall. 

Here’s how to make it:

Wash a few apples. I used five small- to medium-sized apples. Peel and core the apples, then slice the wedges into thin slices.


Throw the apples into a small saucepan. Add a small tab butter and two tablespoons of water to the apples and begin heating over low to medium heat. Stir so that the melted butter and water coat the apples.


Add cinnamon and sugar to your apples. The amount you add is entirely up to you—it really depends on how sweet you want your cobbler to be. I used slightly less than one tablespoon of sugar and almost the same amount of cinnamon.


While the apples are cooking, prepare your granola. It turns out that I didn’t have granola in the house, so I had to improvise. I used my Kashi cereal. If I would have had it in the house, I would have used my Bear Naked Granola. I poured some onto a paper towel, folded it over and used a spoon to crush the large pieces. I then set that aside and got back to the apples.


I let the apples cook for about eight minutes. You could cook them for longer, but I prefer the apples to have a little firmness to them as opposed to falling apart.

Once you’re finished cooking the apples, transfer them to a heat-safe container and top it with the granola. At this point you could even put the cobbler into fancy dessert dishes and serve them.


Delicious! I opted to have my cobbler with a glass of skim milk—comfort food doesn’t get any better.

What are some of your favorite desserts for fall?


Monday, September 3, 2012

Labor Day Party Food Ideas


Happy Labor Day! Today marks the winding down of outdoor parties, beach days and driving with the windows down. I adore summer and am always sad to see it go, but this unofficial end of summer does bring plenty of opportunities to get outside and really enjoy the gorgeous weather before winter rolls in.

If you’re planning to attend a Labor Day barbeque, check out these great ideas for appetizers and dessert. I’m not going to pretend to know anything about grilling, but dessert and appetizers I do know! Here are some of my favorites that are pretty quick to whip up:

Homemade Chips and Fruit Salsa
This takes a bit of prep time, but it’s delicious, totally worth and really easy to do.


Start by picking four or five different fruits. My favorite combination for this recipe is pineapple, blueberries, strawberries, mango and kiwi. Dice the fruits into small pieces and combine them in a bowl. Before adding the really juicy fruits, like pineapple, you may want to press a paper towel on them before mixing otherwise the juice from that one fruit can dominate. Squeeze either some lemon or orange over the top, add a bit of sugar and fold everything together. Cover and refrigerate.

In a small mixing bowl, combine ½ cup white sugar and a tablespoon of cinnamon. You’ll have to eyeball this a bit – if you are a fan of cinnamon, you can add more. Set this aside. Preheat your oven to 350 degrees.

Open a package of 7-inch flour tortillas. Lay one on a cutting board. In a small mixing bowl, melt a few tablespoons of butter so that it is a completely liquid consistency. As soon as you’ve heated the butter, dip a basting brush into the butter and brush it over one side of the tortilla. Immediately take a few pinches of the sugar/cinnamon and sprinkle it over the butter. Make sure you spread it evenly over the tortilla. Using a pizza cutter, cut the tortilla so that you’ve made eight triangular pieces. Immediately transfer these to a baking sheet. Repeat this process until you’ve made enough triangles to fill one baking sheet. When you’ve done that, bake the tortillas for about seven minutes. You’ll need to watch – you are looking for the chips to be light golden brown. Try to do this process quickly and make all the chips you need – the chips are much better when they are a few minutes out of the oven.

Bruschetta
Bruschetta couldn’t be simpler to put together and it’s something that usually impresses. 

Bruschetta with Tomato and Basil

Dice several Roma tomatoes and make sure to remove the seeds. Mince some garlic and basil and mix it in with the tomatoes. Add a little salt, pepper and balsamic vinegar to taste. Refrigerate the mixture for at least one hour. When you are ready to serve, slice some store-bought French bread diagonally so each piece is approximately ¾ inch thick. Lay the slices on a baking sheet and scoop some of the tomato mixture on top of each slice. You could go one step further and add some Parmesan cheese or shredded mozzarella on top. Bake in the oven at 350 degrees until the bread crisps and/or the cheese on top melts. Another option is just to crisp up the bread in the oven and scoop the tomato mixture on afterward.

Cupcakes 


There are plenty of recipes out there for cupcakes and lots of store-bought mix options, so I’ll just share one quick tip on making the cupcakes for your party a little healthier. If you go with a store-bought mix, instead of adding the oil, eggs, water and any other wet ingredients the mix calls for, just add one can of pumpkin. I know how strange this sounds, but trust me. Once you mix that in, bake as directed. The cupcakes won’t come out as smooth on top, but they’ll be a little better for you! 

Have a happy and fun-filled Labor Day!