Follow Our Blog

Our Awesome Followers

Powered by Blogger.

Friday, June 28, 2013

Paleo Coconut Flour Bread Recipe


I made this paleo coconut flour bread the other day and I can't stop eating it. I put a little bit of butter or coconut oil on top after heating it up in the microwave -- so good! The original recipe called for 2 tablespoons of raw honey but I omitted it from my recipe. I didn't miss it one bit, but if you've got a bit of a sweet tooth, you can add that back in to yours.


What you'll need:
3/4 cup     coconut flour
1 tsp     baking powder
1/2 tsp sea salt
1/2 cup     coconut oil, softened
1 Tbsp     cinnamon
1 tsp     vanilla extract
2 Tbsp     raw apple cider vinegar
6 large eggs, separated

What to do:
1. Preheat oven to 350 F and grease a standard loaf pan. Line the bottom of the pan with parchment paper.
2. Mix together coconut flour, baking powder, salt and cinnamon in a large bowl.
3. Add in softened coconut oil and stir till well blended and smooth.
4. Separate the eggs, beat egg whites till stiff and set aside. Add egg yolks, vanilla and apple cider vinegar to the coconut flour mixture.
5. Quickly fold in egg whites to the mixture.
6. Pour the batter into the greased loaf pan.
7. Bake for about 40 minutes.

I hope you enjoy this recipe! Let us know in the comments if you tried it out!


Thursday, June 27, 2013

Review: Veet Ready-to-Use Wax Strips


Disclaimer: I received this package of Veet Ready-to-Use Wax Strips from TotalBeauty.com. 

I was looking forward to trying Veet Ready-to-Use Wax Strips. I received this product free with the intention that I’d submit a review on TotalBeauty.com. If you haven’t heard of TotalBeauty.com, head on over and check it out. It’s full of customer reviews and super helpful if you’re contemplating purchasing a new beauty product. 

Veet’s Ready-to-Use Wax Strip kit comes with 40 strips (20 pairs), 6 wipes to help remove any leftover wax and an instruction card. 


To use, warm one strip between your hands. Once warm, gently peel the halves apart. Apply one strip to your body in the direction of hair growth. Pull your skin taut and quickly remove the strip. One tip—don’t pull upward, pull backward and try to keep the wax strip as close to your skin as possible. This will reduce pain and irritation.

Unfortunately, I didn’t like this product at all. It didn’t remove all the hair, left patches of stickiness and completely irritated my skin. 

I used 6 wax strips on my legs. I was able to use each strip about 3 times before it completely lost effectiveness. The first try removed some hair, but not all. The second and third times I found little noticeable difference. I used the wipes to get rid of the gel stuck on my skin and found that even those didn’t completely get rid of the stickiness.

As soon as I used the strips, my legs were covered in painful red bumps. I know that waxing inevitable causes some irritation, but this didn’t seem normal. After I ripped the first strip off, I really had to psyche myself up to continue. Not only that, I didn’t notice that it kept the hair away from any longer than shaving does. 

I think this product is great in concept, but doesn’t work. All-in-all, I’d rather shave my legs. I really wanted to use more of the product to be able to provide a more accurate review, but wasn’t brave enough to keep using it on my legs (or anywhere else for that matter!).

Have you tried Veet Ready-to-Use Wax Strips or any other at-home waxing kits? What are your thoughts?


Wednesday, June 26, 2013

Sally Hansen Salon Effects Real Nail Polish Strips Review


I decided to give these nail polish strips a try once I got back from my honeymoon. My mom got these for me a while back and I'm not sure what took me so long to try them. My nails were in need of some serious TLC and I was way too lazy to paint them. Perfect solution! 


Although there were several steps to follow, I thought the application was super easy and mess free. My nail polish usually chips a day or two after I put it on (even after a professional manicure) and these lasted days longer! I think the more I practice, the better I would be at applying these. I loved that there was no drying time and I could go about my day right after I put them on. 


I can't wait to try these out again in different colors and styles. Something fun to jazz up my normal colored polish. 

Have you tried out these nail polish strips before? What did you think? 


Tuesday, June 25, 2013

Review: The Body Shop Vitamin E Cool BB Cream


The Body Shop’s Vitamin E Cool BB Cream is a new product designed to illuminate, even skin tone and moisturize for 12 straight hours. 


On The Body Shop website, the BB cream got mixed reviews—some love it, some hate it. Some complaints include that the cream is too thick and it made the skin look blotchy. Other reviews say that the BB cream is in fact lightweight, goes on smoothly, has nice color and hydrates.

My review is also mixed. The product is very creamy, is easy to apply and goes on very smoothly. I typically use my fingers to massage the product into my skin. Once applied, it does provide my skin with a really nice tone and hides any unevenness. 

One of my complaints is about the color—and this is also a complaint about BB creams in general. Since the creams only come in limited shades, it’s just not possible that it will work for anyone. Even the creams that claim they’ll adjust never look completely like your own skin. The Body Shop BB Cream blends easily, but only comes in one color and is a tad orange on me. In addition, the BB cream doesn’t hide blemishes very well. It will even tone, but it won’t hide all imperfections.

Vitamin E Cool BB Cream is available at The Body Shop for $22. 

Have you tried any makeup products from The Body Shop?


Monday, June 24, 2013

Amanda's First ipsy Bag Review


I finally made the switch from Birchbox to ipsy and I am SO glad that I did. Not only are the products I received a lot better (I liked 4 out of 5 of them and usually I only like one from my Birchbox) but they were FULL sized products instead of tiny samples. All for the same price! I couldn't believe the difference and do not regret the switch at all. 

The products all came in a cute bag that matched the theme of the month. June was On the Wild Side. Pretty fitting, no? 


Here's what  I got this month: 


1. Cailyn Cosmetics Line-Fix Gel Eyeliner with built-in brush in Iron. I loved the applicator on this gel eyeliner. I was able to easily make a sexy cat eye look without the mess. I really liked the color too. Iron was a darker grey and wasn't too harsh to wear during the day. I can't wait to create more makeup looks with this! 


2. NYX Cream Blush in Boho Chic. Another winner. This blush was perfect with my coloring and lasted all day. I loved the creamy texture and the way it glided on my skin. Definitely recommend this product! 


3. J.Cat Beauty Sparking Cream Palette. This was the one thing in my bag that I did not like this month. You can't use this on your eyes so it has to be applied somewhere on your body. I haven't used body glitter since the 8th grade (embarrassingly enough my girlfriends and I used to dump buckets of glitter on ourselves before going to our middle school dances. The horror!) Some reviewers have suggested mixing this with nail polish -- not a bad idea that I might look into if I don't use this for halloween or give it to my niece to play with. Oh well, they can't all be fantastic! 

4. Starlooks Lip Pencil in Tipsy. I loved this lip pencil! It was a perfect coral color that looks great with my coloring. It stayed on forever and didn't have a bad smell or taste. I was searching for a coral lip liner and am so glad that I waited for this! 

5. Chella Ivory Lace Highlighter Pencil. This highlighter pencil is amazing. I used it in place of my concealer when I tried it out and it did a great job of covering my under eye circles and highlighted the features in my face very well. I've been wanting to try a pencil like this and am so glad I received it this month! 

Overall I loved my ipsy bag and can't wait to see what I get next month! So long, Birchbox! You won't be missed :) 

Want to try out ipsy for yourself? Click here to sign up! 


Friday, June 21, 2013

How Will You Be Following A Love Affiar With Eyeliner After July 1?


Have you heard? As of July 1st, Google Reader will be no more. Yep, sad but true. So now's a great time to make sure you're subscribed to our blog in other ways, like with Bloglovin, Facebook, Pinterest or Twitter.
 
Need an introduction on Bloglovin? Click here for a post on how to move your Google Reader subscriptions to Bloglovin, and click here for a post that goes a little more in depth on why Bloglovin rocks. We've been using it for a while, and couldn't be happier!
 
Thank you all so much for reading our blog every day. We wouldn't be here if it wasn't for each and every one of you! Have a great weekend filled with sun, happiness and laughter :)


Wednesday, June 19, 2013

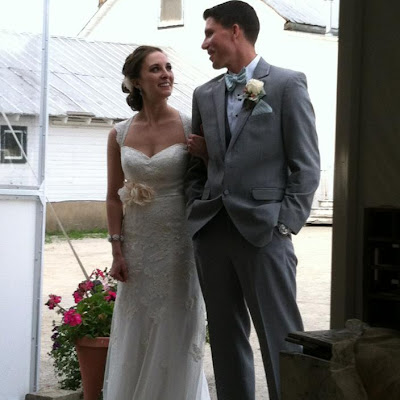
Amanda's Wedding Day Look

 
I'm back! Maui was amazing and I can't believe our honeymoon is already over. We filled our days with the beach, pool, snorkeling, zip lining, biked down a volcano (yes, really!), spent some time at the spa and even surfed! It was truly an amazing honeymoon. We took over 1,100 pictures (thanks to my amazing husband who kept busting out the camera to capture all of these fun memories) and I can't wait to go through them all.
 
We won't have our professional photos back from the wedding for a while, but I've got a few pictures to share that family and friends took so you can see my complete wedding day look!

I already shared my hair and makeup pictures from my trial and I am pleased to say that my hair and makeup turned out even better than I ever imagined on the day of. I was so happy with the way I looked and I truly felt beautiful.

My dress was a classic lace dress with a keyhole back from David's Bridal. I wanted to go with something that fit our vintage venue and was easy to dance in. It was the perfect dress for our wedding and I wouldn't change a thing. I couldn't believe the prices of some dresses when I started looking and was so happy I found this one at a reasonable price. I had some minor alterations such as adding cups, taking it in at the hips and moving the straps down a bit. I also added my own sash that I purchased off of Etsy.

I wore blush colored Vera Wang Lavender shoes for the pictures, ceremony and first dance and then ditched them for some more comfortable flats for dancing. I was so happy that I brought a different pair, my feet would have been so angry if I didn't.
 
I'm so lucky I had such amazing bridesmaids to help me get ready on the biggest day of my life! Adrianne is nothing short of an amazing friend and I'm so happy she was there by my side :)

 
I can't wait to share more wedding details with you!


Monday, June 17, 2013

Review: CoverGirl LashBlast 24-Hour Mascara


I am a huge fan of CoverGirl and a lot of their products. They offer some really solid makeup at affordable prices. One of my go-to products from the brand is their LashBlast mascara in very black. It’s something I always have in my makeup bag and continue to repurchase.

Recently, I ran out of my LashBlast mascara and made a trip to Target to buy another. Instead of going with my staple, I opted for the LashBlast 24-Hour formula in very black. This mascara is not waterproof, but designed to stay on even longer than the original LashBlast formula. 


I rarely give products horrible reviews because I think there are usually merits to any product, but I hated this mascara. It’s crazy how a mascara from the same line can be so drastically different and inferior to its original counterpart.

The first time I wore the product was at Amanda’s wedding two Saturdays ago. (See my bridesmaid look here!) It looked nice, but I noticed the formula was thick and a little harder to apply than the original. My real problem with the product wasn’t in how it looked, but removing it. At the end of the day, I washed my face and used my eye makeup remover. At the time I didn’t realize that all of the product didn’t come off. The following day I didn’t wear makeup. On Monday morning while getting ready for work, I applied the product again and noticed that it was hard to comb the brush through my lashes. It was then that I realized that some of the product was still on my lashes. My lashes looked clumpy. That night when removing my makeup, I took extra time to try to get the product off. It wouldn’t budge. I stopped using the mascara and it took a few extra days to completely banish the product from my lashes. I can’t imagine what the result would have been had I kept using the mascara every day.

I ended up throwing out the product after only a couple uses. It was a waste of money and I’ve since gone back to Target to purchase the original LashBlast mascara.

Have you tried CoverGirl’s LashBlast 24-Hour Mascara? 


Friday, June 14, 2013

Tips for Getting Long, Strong, Healthy Hair


Ever since I was little I've almost always had long hair (minus a few unfortunate short cuts that I will never understand). 


It's hard to keep long hair healthy. Here are some of the things that have really helped me over the years and I hope they help you too! 

1. Never brush your hair -- especially when it's wet. This will cause all kinds of damage and breakage. Use a wide tooth comb instead and slowly comb through your hair to remove the tangles. 

2. Do a deep conditioning treatment about once a week. Let it sit on your hair for about 10 minutes before rinsing it out. Your hair will feel smooth and look so shiny.

3. Put your blowdryer down. It may not be fun to sit around with wet hair but I promise you, you'll see a huge difference in how healthy your hair looks if you don't blow dry it every day. I usually wash my hair at night and let it air dry. I touch it up when I get up with a quick swoop of my curling iron or flat iron. 

4. Use a hair protecting serum when you have to apply heat. Need to curl or straighten your hair? Apply a hair protecting serum beforehand to minimize the damage. 

5. Go for regular trims. It may seem silly to cut it often when you're trying to grow out your hair but I promise this will do wonders for the health of your hair. Your split ends will be minimal and you'll give your hair a real chance to grow. Try to get a trim every 6-8 weeks if you can.

6. Take fish oil, vitamin E and flax seeds. These really help promote hair growth and I've seen a huge difference since I started taking them in my hair, skin and nails. 

7. Don't wash your hair every day. Use dry shampoo between washings if your hair is on the greasy side. Washing it will dry your hair out and it's really harsh on your hair. I promise you will see great results! 

These are some tips that have helped me maintain long healthy hair over the years. Do you have any tips to share? 


Thursday, June 13, 2013

Bridesmaid Hair and Makeup


Amanda got married over the weekend and it was a GORGEOUS wedding! I had the honor of standing up as one of her bridesmaids. 

Amanda will be sharing her wedding day look when she gets home from her Hawaiian honeymoon. In the meantime, here’s my look:

Makeup: Laura Geller Spackle Under Makeup Primer, Urban Decay Primer Potion in Original, The Body Shop BB Cream, Benefit Erase Paste, CoverGirl Pressed Powder, CoverGirl LashBlast Mascara, CoverGirl Cheekers Blush in Snow Plum, CoverGirl Lip Perfection Jumbo Gloss Balm in Coral Twist, Clinique Long Last Glosswear in Air Kiss, Urban Decay Naked 2 Palette (Bootycall and Suspect), Sephora Nano Eyeliner in Black, Eyeko Skinny Liquid Eyeliner in Black, Avon Brow Pencil in Light Brown, CoverGirl Clear Mascara


Hair: Done by amazing hairstylist. Here was my inspiration picture:

Updo

Dress: J. Crew


Shoes: Coach


Congrats to Amanda and Jay! Stay tuned for her lovely wedding day look. :)